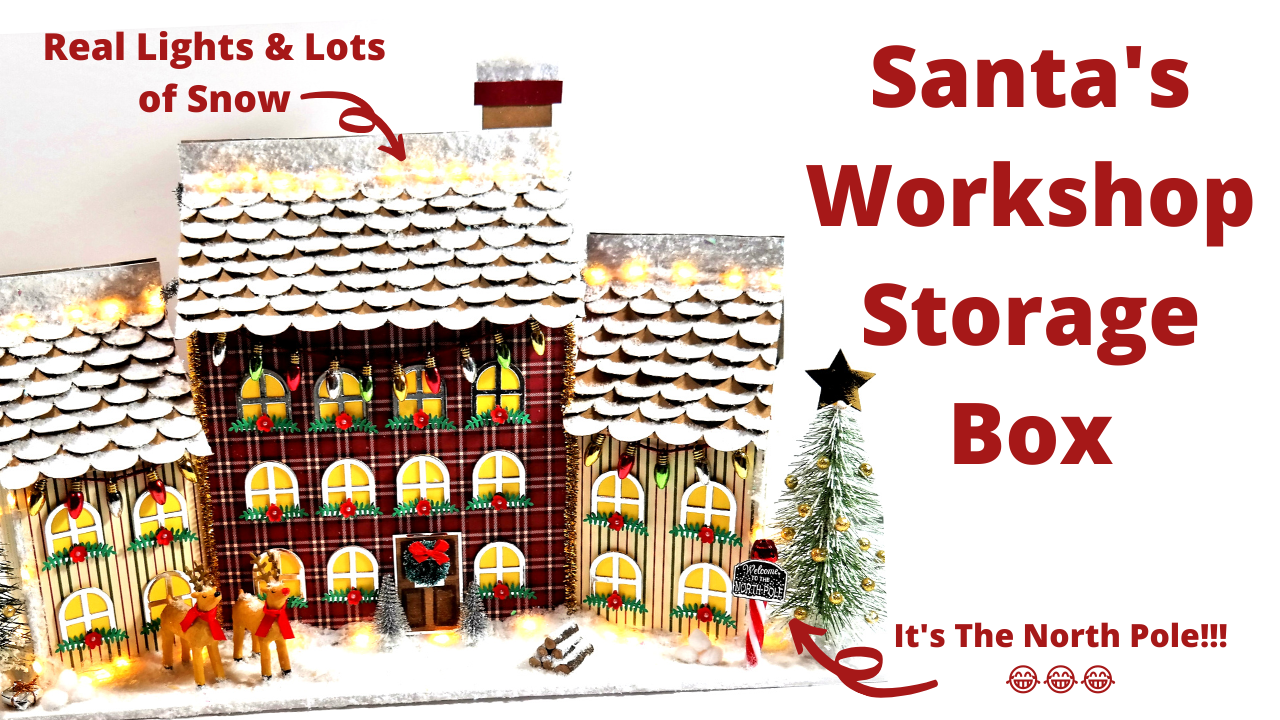
Hello friends, today I’m sharing my Santa’s Workshop Storage Box!

I’ve had this on my list since I made the Shed Shed & Bird Box.
I’m so pleased with how it turned out and I think it looks really cute!

The main structure is very straight forward and pretty quick to make, as always it’s the decoration and deciding what papers you want to use, which takes the time.
I love all the little details, the ‘North Pole’ sign, baubles on the trees, hanging lights and flowers under the window.

I went mad on the snow, I wanted it to be covered, so I painted the scalloped tiles white and then covered it in glue and dumped a load of the artificial snow over the top.

The raindeers are very cute, I added Nuvo Drops to make the noses more prominent.
I waiting for my order of mini Christmas presents to arrive. Once I have them I will update the photos and add in the link to the ones I used.

The little pile of logs is very cute too!

SUPPLIES USED TO MAKE THIS
2-3mm greyboard available here or white foam board available here.
Artificial snow, available here.
The window frames were from a die from the Simply Made Crafts ‘Milk Box Set’ which is currently on sale here.
‘North Pole’ sign stamp from Crafts Beautiful magazine.
Christmas Light Charms available here.
The cute Raindeers I got from Wilkinsons.
The small wooden sticks I used for logs, were purchased from The Works.
The Christmas trees are from Sainsbury’s.
MEASUREMENTS NEEDED TO MAKE THIS
2 pieces of 8″ x 8″ greyboard for the front and back of the main house.
2 pieces of 4″ x 8″ greyboard for the sides of the main house.
4 pieces of 2″ x 8″ kraft card for the hinges for the main house.#
Score along the 2″ side at 1″
2 pieces of 8″ x 8″ pattern paper for the front and back of the main house.
2 pieces of 4″ x 9″ pattern paper for the sides of the main house.
2 pieces of 5″ x 8.1/2 kraft card for the roof.
Score along the 5″ side at 1″
2 pieces of 2″ x 8″ kraft card for the hinges of the roof.
Score along the 2″ side at 1″
8 pieces of 4″ x 5.1/2 greyboard for the smaller houses.
8 pieces of 2″ x 5.1/2 kraft card for the hinges for the smaller houses.
Score along the 2″ side at 1″
4 pieces of 4″ x 5.1/2 pattern paper for the front & back of the smaller houses.
4 pieces of 4″ x 6.1/2 pattern paper for the sides of the smaller houses.
4 pieces of 4.1/4 x 5″ kraft card for the roof of the small houses.
Score along the 5″ side at 1″
4 pieces of 2″ x 4″ kraft card for the hinges of the roof.
Score along the 2″ side at 1″
1 piece of 21″ x 8″ greyboard or foam board for the base.
1 piece of 1.1/2 x 2.1/2 kraft card for the door.
Lots of 1″ circles for the roof detail.
I still need to cover the inside so I will add in the measurements for that once I’ve done it.
Check out my full tutorial below.
I can’t wait for the presents to arrive so I can finish it off.

I really hope you have enjoyed today’s rather big tutorial and you give it a go.
Have a wonderful day.
Happy crafting.
Sam
xoxo
Disclaimer Some of the product links used are affiliated, these do not cost you extra but by using them I will receive a small % of the sales which then help me to continue bringing you great YouTube tutorials. Thank you all for your support.

You must be logged in to post a comment.